

本文转载自 燕归来
Apache Shiro是Java的一个安全框架。目前,使用Apache Shiro的人越来越多,因为它相当简单,对比Spring Security,可能没有Spring Security做的功能强大,但是在实际工作时可能并不需要那么复杂的东西,所以使用小而简单的Shiro就足够了。对于它俩到底哪个好,这个不必纠结,能更简单的解决项目问题就好了。
本博文仅仅介绍怎么使用,至于底层原理的源码,待以后再来慢慢分析。
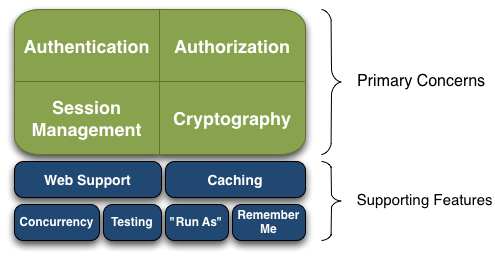
Shiro可以非常容易的开发出足够好的应用,其不仅可以用在JavaSE环境,也可以用在JavaEE环境。Shiro可以帮助我们完成:认证、授权、加密、会话管理、与Web集成、缓存等。这不就是我们想要的嘛,而且Shiro的API也是非常简单;其基本功能点如下图所示:
下面开始一步一步实现Shiro和Spring的继承,项目使用Maven搭建.
POM文件
shiro需要的jar包如下,导入即可
    <!--shiro核心包-->
    <dependency>
        <groupId>org.apache.shiro</groupId>
        <artifactId>shiro-core</artifactId>
        <version>1.2.2</version>
    </dependency>

    <!--shiroweb包-->
    <dependency>
        <groupId>org.apache.shiro</groupId>
        <artifactId>shiro-web</artifactId>
        <version>1.2.2</version>
    </dependency>

    <!--spring集成shiro包-->
    <dependency>
        <groupId>org.apache.shiro</groupId>
        <artifactId>shiro-spring</artifactId>
        <version>1.2.2</version>
    </dependency>

    <!--shiro缓存配置-->
    <dependency>
        <groupId>org.apache.shiro</groupId>
        <artifactId>shiro-ehcache</artifactId>
        <version>1.2.2</version>
    </dependency>

    <!--缓存支持包-->
    <dependency>
        <groupId>net.sf.ehcache</groupId>
        <artifactId>ehcache-core</artifactId>
        <version>2.5.0</version>
    </dependency>

    <!--缓存规范接口-->
    <dependency>
        <groupId>org.slf4j</groupId>
        <artifactId>slf4j-jdk14</artifactId>
        <version>1.5.6</version>
    </dependency>
创建配置文件
在类目录下创建spring-shiro.xml配置文件,内容如下,具体配置信息,参考注释.
<?xml version="1.0" encoding="UTF-8"?>
<beans xmlns="http://www.springframework.org/schema/beans"
       xmlns:xsi="http://www.w3.org/2001/XMLSchema-instance"
       xmlns:mvc="http://www.springframework.org/schema/mvc"
       xmlns:context="http://www.springframework.org/schema/context"
       xmlns:aop="http://www.springframework.org/schema/aop"
       xsi:schemaLocation="http://www.springframework.org/schema/beans
                        http://www.springframework.org/schema/beans/spring-beans-4.0.xsd
                        http://www.springframework.org/schema/mvc
                        http://www.springframework.org/schema/mvc/spring-mvc-4.0.xsd
                        http://www.springframework.org/schema/context
                        http://www.springframework.org/schema/context/spring-context-4.0.xsd
                        http://www.springframework.org/schema/aop
                        http://www.springframework.org/schema/aop/spring-aop-4.0.xsd
                        http://www.springframework.org/schema/tx
                        http://www.springframework.org/schema/mvc">

    <!--配置securityManager-->
    <bean id="securityManager" class="org.apache.shiro.web.mgt.DefaultWebSecurityManager">
        <!--配置缓存管理器-->
        <property name="cacheManager" ref="cacheManager"/>
        <!--配置Reamle-->
        <property name="realm" ref="customReamle"/>
    </bean>

    <!--配置缓存管理器-->
    <bean id="cacheManager" class="org.apache.shiro.cache.ehcache.EhCacheManager">
        <!--缓存管理的配置文件放在类目录下,其配置内容在后文-->
        <property name="cacheManagerConfigFile" value="classpath:ehcache.xml"/>
    </bean>

    <!--配置Reamle-->
    <bean id="customReamle" class="com.tao.spring.shiro.CustomReamle">
        <!--Reamle域的加密配置-->
        <property name="credentialsMatcher">
            <!--创建一个Bean -->
            <bean class="org.apache.shiro.authc.credential.HashedCredentialsMatcher">
                <!--指定的加密方式-->
                <property name="hashAlgorithmName" value="MD5"/>
                <!--循环加密的次数 1024-->
                <property name="hashIterations" value="1024"/>
            </bean>
        </property>
    </bean>

    <!--其可以自定的调用Spring IOC容器中Shiro bean的生命周期方法-->
    <bean id="lifecycleBeanPostProcessor" class="org.apache.shiro.spring.LifecycleBeanPostProcessor"/>

    <!--启用IOC容器中的shiro注解-->
    <bean class="org.springframework.aop.framework.autoproxy.DefaultAdvisorAutoProxyCreator"
          depends-on="lifecycleBeanPostProcessor"></bean>
    <bean class="org.apache.shiro.spring.security.interceptor.AuthorizationAttributeSourceAdvisor">
        <property name="securityManager" ref="securityManager"></property>
    </bean>

    <!--配置Shiro-->
    <!--此Bean的id必须和web.xml文件中的shiroFilter过滤器的名称一致,否则会抛出异常-->
    <bean id="shiroFilter" class="org.apache.shiro.spring.web.ShiroFilterFactoryBean">
        <property name="securityManager" ref="securityManager"/>
        <!--设置登陆界面-->
        <property name="loginUrl" value="/shiro/toLoginPage"/>

        <!--配置详细信息,支持通配符-->
        <!--  anon 表示页面不需要登录即可访问-->
        <!--  authc 表示页面需要认证才可以访问-->
        <!--logout 表示注销认证状态-->
        <property name="filterChainDefinitions">
            <value>
                /login/toLoginPage = anon
                /login/toSuccessPage = authc

                /api/login = anon
                /api/logout = logout

                /shiro/toLoginPage = anon
                /shiro/toFailPage = anon
                /shiro/login* = anon
                /shiro/** = authc
            </value>
        </property>
    </bean>

</beans>
创建登陆接口的创建
在登陆接口中,主要的步骤如下
- 获取subject
- 封装UsernameAndPasswordToken对象
- 使用subject进行登陆操作
@RequestMapping(value = "/login", method = RequestMethod.POST)
    public ModelAndView getList(String username, String password) {
        ModelAndView modelAndView = new ModelAndView();
        if (Strings.isNullOrEmpty(username) || Strings.isNullOrEmpty(password)) {
            modelAndView.setViewName("redirect:/shiro/toFailPage");
            return modelAndView;
        }
        //获取当前的subject
        Subject subject = SecurityUtils.getSubject();
        //封装UsernameAndPassword
        UsernamePasswordToken token = new UsernamePasswordToken(username, password);
        try {
            //尝试登陆,如果登录失败会返回不同的异常,这些异常的父类是AuthenticationException
            subject.login(token);
            modelAndView.setViewName("redirect:/shiro/toSuccessPage");
            return modelAndView;
        } catch (AuthenticationException ae) {
            System.out.println("认证出现异常,异常信息:" + ae.getMessage());
            modelAndView.setViewName("redirect:/shiro/toFailPage");
            session.setAttribute("exception",ae);
            return modelAndView;
        }
    }
退出登录接口的创建
退出登录接口的操作非常简单,只要获取当前subject,然后使用其logout方法即可,当前或者在spring-shiro.xml文件中使用/** = logout 的方式也可以实现。
@RequestMapping(value = "/logout",method = RequestMethod.GET)
public ModelAndView loginOut(){
    SecurityUtils.getSubject().logout();
    ModelAndView modelAndView =new ModelAndView("/shiro/login");
    return modelAndView;
}
配置Reamle域
Reamle是在spring-shiro中装配的并且在其中我们还是制定了密码的加密方式,下面来实现这个类,实现这个类需要继承Reanle接口,但是我们可以继承这个接口的实现类,从而减少工作量,继承AuthenticatingRealm类,实现其中的doGetAuthenticationInfo(AuthenticationToken authenticationToken) 的方法即可,这里一般使用DAO层方法,做一些密码的验证和获取。
其步骤如下:
1、将authenticationToken强转为UsernameAndPasswordtoken
2、获取用户名和密码
3、调用数据库查询
4、没有用户,返回 UnknownAccountException
public class CustomReamle extends AuthenticatingRealm {
@Override
protected AuthenticationInfo doGetAuthenticationInfo(AuthenticationToken authenticationToken)  throws AuthenticationException {
    //强转为UsernameAndPassword,这个对象就是我们在Controller层传递的过来的
    UsernamePasswordToken token = (UsernamePasswordToken) authenticationToken;
    //获取账户和密码
    String username = token.getUsername();
    String password=new String(token.getPassword());
    //一些处理逻辑,这些应该是数据库的查询
    //主要是检查账户信息和状态,获得账户实体对象,这里实现了逻辑
    //根据数据库查到的结果抛出不同的异常信息
    //UnknownAccountException 未知的账户异常
    //LockedAccountException 账户已被锁定,无法登陆异常
    //当然还有其他的,比如密码错误异常 IncorrectCredentialsException
    if (username.contains("123")){
        throw new UnknownAccountException("账户不存在");
    }

    if ("admin".equals(username)){
        throw new LockedAccountException("账户被锁定,无法登陆!");
    }

    //构建返回对象
    //用户实体对象,这个对象应该是User表的对应类的实体
    Object princial = username;
    //由于在Reamle中,我们的配置了加密方式,因此这里也要进行加密,这个密码是从数据苦中获取的加密后的密码
    //MD5盐值加密,加密2014次,盐值我们不使用,这里设置为null
    SimpleHash md5= new SimpleHash("MD5","123456",null,1024);
    Object pass = md5;
    //获取当前的域名称,通过这些名称可以获取一些参数
    String realName = getName();
    //传递用户对象和用户的加密后的密码,shiro自行比较
    SimpleAuthenticationInfo sm = new SimpleAuthenticationInfo(princial,pass,realName);
    return  sm;
}
先前就是这样的一个流程,在spring-shiro.xml文件中配置一些需要登录才能访问的页面权限,即可简单的实现一些登陆操作!